The main reason to use .NET core is that you can run it on multiple platforms and architectures. That’s why you can build an application that can be run on Windows, MacOS, Linux, and other different operating systems and architectures.
In this article, you will learn about many reasons for using the .NET Core. In this article, we will show you to create a simple .NET Core application that that’s able to run on multiple operating systems. To work with the demo as this article you should run your computer on Windows 10 operating system you have to install Visual Studio 2017 and .NET Core 2 SDK.
Additionally, if you want to run your app on MacOS you will need access to running MacOS 10.12 or any latest version.
.NET Core App Deployment Options
You can deploy .NET Core applications as framework-dependent applications and also as self-contained applications. There are mainly two deployment models and there are some differences between them.
Framework dependent applications :
It is essential to install the .NET Core framework in the system that can run the app.
Framework dependent application can run on any operating system on which you install .NET Core without any modifications.
Self-Contained applications :
Self-Contained applications do not need to install any .NET Core framework because it contains everything that the app needs to run.
For every operating system that you want a self-contained app to run on, you have to publish an Operating System specific version.
How to Create Application for multiple Operating System
Now, after knowing the two different deployment options, let’s explore to use those options to run a .NET Core application on multiple operating systems. We explain you about to create a demo .NET Core applications and run that on Windows and Mac Operating System.
We will create the .NET Core application using Visual Studio 2017. This is technically not essential as you can create .NET Core applications with different IDE and command line. Choose any of one from both of them that you are comfortable most.
Framework Dependent Application
First, we will create a framework dependent app. We do this in Visual Studio 2017 with the version 15.5.2.
So, you can follow the following steps.
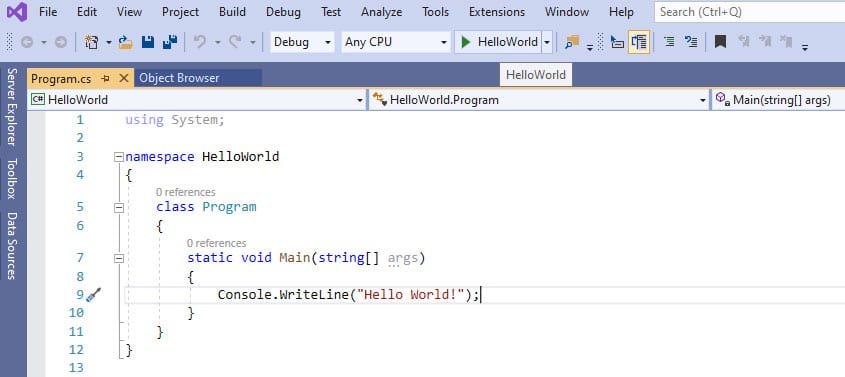
1) In visual studio -> Click File -> New Project -> .NET Core.
Then select the console app and create it.

2) Navigate to program.cs and it will let you write “Hello World!”.
Add Console.RedLine(); below the “Hello” line to keep open the console window at the time of running of the application.
Self Contained Application
In this step, we will contain the application. This is similar to create a framework dependent app but with one extra step.
For that, you can follow the following steps.
1) In visual studio -> Click File -> New Project -> .NET Core.
Then select the console app and create it.
2) Navigate to program.cs and it will let you write “Hello World!“.
Add Console.RedLine(); below the “Hello” line to keep open the console window at the time of running of the application.
3) Now for the extra step to make this in a self-contained app right-click on the project file and click on the “End Project”.
Now in the project file add a line as per following in <propertyGroup>
<RintimeIdentifiers>win10-x64</RintimeIdentifiers>
This will tells .NET Core which runtimes it can be built and published to create self-contained apps. Like this, the application can only be published for Windows 10.
Running the Application on Windows and MacOS
Now, after this, we have two .NET Core applications, we need to publish them, as you would do in production, to get a release build. We can follow the same steps for Windows applications.
- Right Click on Project File in Visual Studio and click on Publish.
- Then you can pick a folder and click publish.
- Do the same for the Self-contained app.
Publishing for Run on MacOS
We should not do anything special steps to running the app on MacOS. We can just use the previous steps. If you need the self-contained app to run on anything then you need to perform some additional steps.
- Right Click on PROJECT File of a self-contained app in visual studio and click on Edit Project to edit the project file.
- Now add a new RuntimeIdentifiers to the file and save it as follows.
<RuntimeIdentifiers>win10-x64;osx.10.12-x64<RuntimeIdentifiers>
- Now right-click on Project file and click Publish.
- Click on a setting link In a publish overview.
- This will opens a profile setting popup, you make sure that you have selected the target runtime osx.10.12-x64.
- Change the target location to another folder so you can differentiate between the published results for Windows and MacOS.
- Click on Save and then click on Publish.
Running the Application on Windows
Now, you have the following publish results.
Results for the Framework Dependent App.
Results for self-contained App for windows and MacOS.
Let’s run the Framework Dependent Application on Windows Operating System.
- Open Windows Explorer.
- Navigate to the folder that contains the published results for the framework dependent app.
- Now go to the navigation bar and type “cmd” before the path and press enter. This will opens command prompt with the context of a folder. And make sure that this will only work with windows 10.
- Now type dotnetFrameworkDependentApp.dll.
- Now you will see “Hello World!” on command prompt window as an output.
Now, we are going to run a self-contained app. This is easy because it contains all the necessary things that need to run the application. This is the means that it has a packaged that app and .NET Core and an exe file that you need to run.
- Navigate to the folder with publishing results for the self-contained application for windows.
- Double-click the SelfContainedApp.exe.
- The app runs and shows “Hello World!” in a command window.
Running the Application on MacOS
The process to run the app on MacOS is very similar to Windows. Let’s show the steps for running an app on MacOS.
Framework Dependent App run on MacOS
- First, you need to install .NET Core framework dependent app on MacOS. You do not need to install SDK, you need the only runtime.
- Now, open the terminal window.
- In the terminal window, navigate to the folder which contains framework dependent app files.
- Then Type dotnetFrameworkDependentApp.dll in the Terminal Window and press the enter.
- Now, this app will run and show “Hello” on the terminal screen.
Self-contained App run on MacOS
Execute the following steps to run self-contained app on MacOS.
- First open a terminal window.
- In the terminal window, navigate to the folder that contains self-contained app files.
- Then type sudo chmod + x selfcontainedapp and press enter.
- Type in password of your admin account and press enter to grant permission to run the app.
- Now type in open selfcontainedapp and press enter.
- Now the app will run and shows “Hello” in the new terminal window.
Like this, you can make and run .NET Core App on different Operating Systems.
Conclusion
One of the main advantages of .NET Core is that you can use it to run an application on multiple platforms. It is very simple to create a framework dependent application that can run on multiple platforms. In order to run, It only needs .Net Core runtime to be installed. If you are a .NET developers or an ASP.NET Development Company then you need to know about to build cross-platform .NET Core apps.